반응형
[출처]
1. Vscode에서 AICodeHelper 설치하고 셋팅
- ChatGpt api key 받고 AICodeHelper 설정
2. AICodeHelper 기본적인 사용법
- 프로그램 영역 설정하고 컨트롤 알트 쉬프트 콤마 눌러서 입력창에 요청사항 입력하기
- 단축키로 미리 설정된 프롬프트 활용 : 코드 리뷰, 코드주석달기, 코드의 오류 수정, 만들고 싶은 것에 대한 묘사를 기반으로 코드 생성, 변수이름 작명, 코드 리팩토링
3. ChatGpt api 사용법
- 원하는 출력을 위한 프롬프트 방식
- 원하는 출력을 위한 퓨샷러닝 방식
<!DOCTYPE html>
<html>

<head>
    <title>여러줄 쓰는 입력란</title>
    <style>
        body {
            background-color: black;
            color: white;
            font-size: 20px;
            font-family: Arial, sans-serif;
        }

        input[type="submit"] {
            background-color: #3498db;
            color: white;
            font-size: 16px;
            padding: 8px 16px;
            border: none;
            border-radius: 4px;
            cursor: pointer;
        }
    </style>
</head>

<body>
    <form>
        <textarea id="myInput" rows="5" cols="50"></textarea>
        <br><br>
        <input type="button" value="색 추천 요청" onclick="displayInput()">
        <br><br>
        <div id="output"></div>
    </form>

    <script>
    const chatGPT = async (messages, parameters = {}) => {
        const apikey = 'API-KEY';
        // messages가 문자열인 경우 배열로 변환
        if (messages[0].constructor === String) return await chatGPT([['user', messages[0]]]);
        // messages 배열의 요소들을 role과 content 속성을 가진 객체로 변환
        messages = messages.map(line => ({ role: line[0], content: line[1].trim() }))
        console.log(1)
        // OpenAI API에 요청을 보내기 위한 fetch 함수 호출
        const response = await fetch('https://api.openai.com/v1/chat/completions', {
            method: 'POST',
            headers: { 'Content-Type': 'application/json', Authorization: `Bearer ${apikey}` },
            body: JSON.stringify({ model: 'gpt-3.5-turbo', messages, ...parameters }),
        });
        // 응답 데이터를 json 형태로 변환
        const data = await response.json();
        // 에러가 발생한 경우 에러 메시지 출력
        if (data?.error?.message) throw new Error(data.error.message);
        // OpenAI API에서 반환한 응답 데이터에서 추천 색상 코드와 이유를 추출하여 반환
        return data.choices[0].message.content.trim();
    };

    async function displayInput() {
        // 입력된 텍스트를 가져와서 불필요한 공백 제거
        var input = document.getElementById("myInput").value.trim();
        // 입력된 텍스트가 없는 경우 알림 메시지 출력
        if (!input) alert('묘사해주세요')
        // 입력된 텍스트를 OpenAI API에서 인식할 수 있는 형태로 변환
        input = `DESC::${input}`
        console.log(input)
        let response
        try {
            // OpenAI API에 요청을 보내서 추천 색상 코드와 이유를 가져옴
            response = await chatGPT([
                ['system', `The assistant's job is to recommend color codes that match what user's describing. Response JSONArray like ["","",...]. reasonForRecommendation to be in korean. Return only JSON Array. Remove pre-text and post-text.`],
                ['user', 'DESC::맛있는 딸기'],
                ['assistant', '{"reasonForRecommendation":"..","colorlist":["#000000","#000000","#000000","#000000","#000000"]}'],
                ['user', 'DESC::우거진 숲속의 소나무'],
                ['assistant', '{"reasonForRecommendation":"...","colorlist":["#000000","#000000","#000000","#000000","#000000"]}'],
                ['user', 'DESC::드넓은 사막의 모래'],
                ['assistant', '{"reasonForRecommendation":"....","colorlist":["#000000","#000000","#000000","#000000","#000000"]}'],
                ['user', input],
            ], { temperature: 0.8 })
        } catch (e) {
            // 에러가 발생한 경우 콘솔에 에러 메시지 출력
            console.log(e.message)
            return;
        }

        // 추천 색상 코드와 이유를 출력할 요소를 가져옴
        var outputText = document.getElementById("output");
        console.log(response)
        // OpenAI API에서 반환한 JSON 형태의 응답 데이터를 객체로 변환
        const color = JSON.parse(response);
        // 추천 색상 코드를 출력할 div 요소를 생성하여 색상을 적용하고 출력할 요소에 추가
        for (let i = 0; i < color.colorlist.length; i++) {
            const divElem = document.createElement('div');
            divElem.style.backgroundColor = color.colorlist[i];
            divElem.textContent = color.colorlist[i];
            outputText.appendChild(divElem);
        }
        // 추천 이유를 출력할 div 요소를 생성하여 출력할 요소에 추가
        const divElem = document.createElement('div');
        divElem.textContent = color.reasonForRecommendation
        outputText.appendChild(divElem);
    };

    </script>
</body>

</html>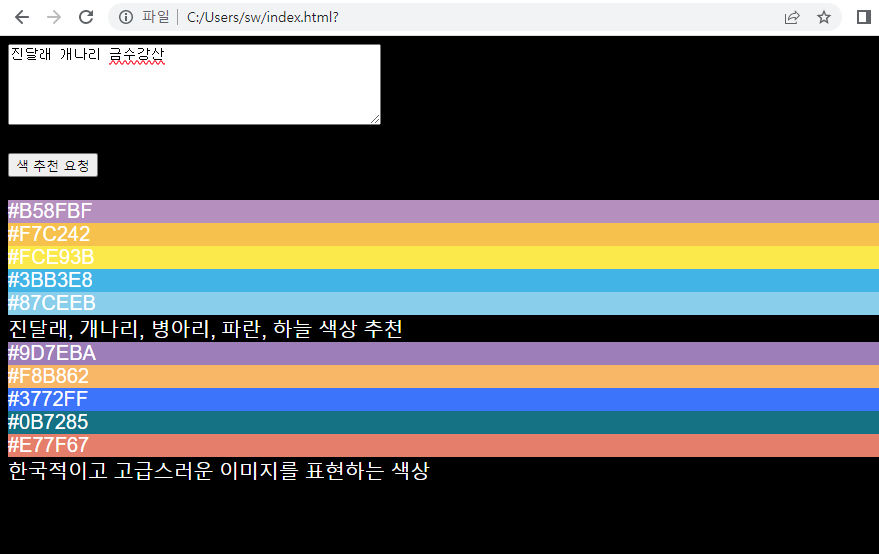
반응형
'머신러닝' 카테고리의 다른 글
| 12 RAG Pain Points and Proposed Solutions (1) | 2024.02.27 |
|---|---|
| chat-gpt(AI)를 이용한 날로 먹는 (블로그) 글쓰기 (0) | 2022.12.16 |
| 인공지능(AI) 이용하여 동화책 만들기 (1) | 2022.12.15 |
| 문서 요약 summarize, summarizer, summarizing (0) | 2022.11.23 |
| 강화학습 - RND (Exploration by Random Network Distillation) (0) | 2021.01.20 |